Building with the Headless API
Learn everything you need to know as a developer to build upon the APIs to create faster Web experiences.
Prerequisites:
- You have gone through the Getting started tutorial and successfully created a project.
- You have advanced web developer knowledge e.g. you know how to write TypeScript code, JSX and are familiar with frameworks like Astro and Tailwind CSS to style components.
- You have a GitHub account, and understand Git basics.
- You have Node and npm installed for local development.
- You have a Netlify account for publishing.
This tutorial is designed for use with macOS, Chrome and Stackblitz as the development environment. The screenshots and instructions provided are based on this setup. If you choose to use a different operating system, web browser, or code editor, please be aware that the user interface and required steps may differ accordingly.
Getting started#
We created a fictitious restaurant named Uncle Tony's and built the same site with multiple frameworks deployed to different hosting providers but with the same source of content.
All sites are edge-side-rendered to enable dynamic content updates while maintaining exceptional performance, and use TypeScript and Tailwind CSS under the hood.
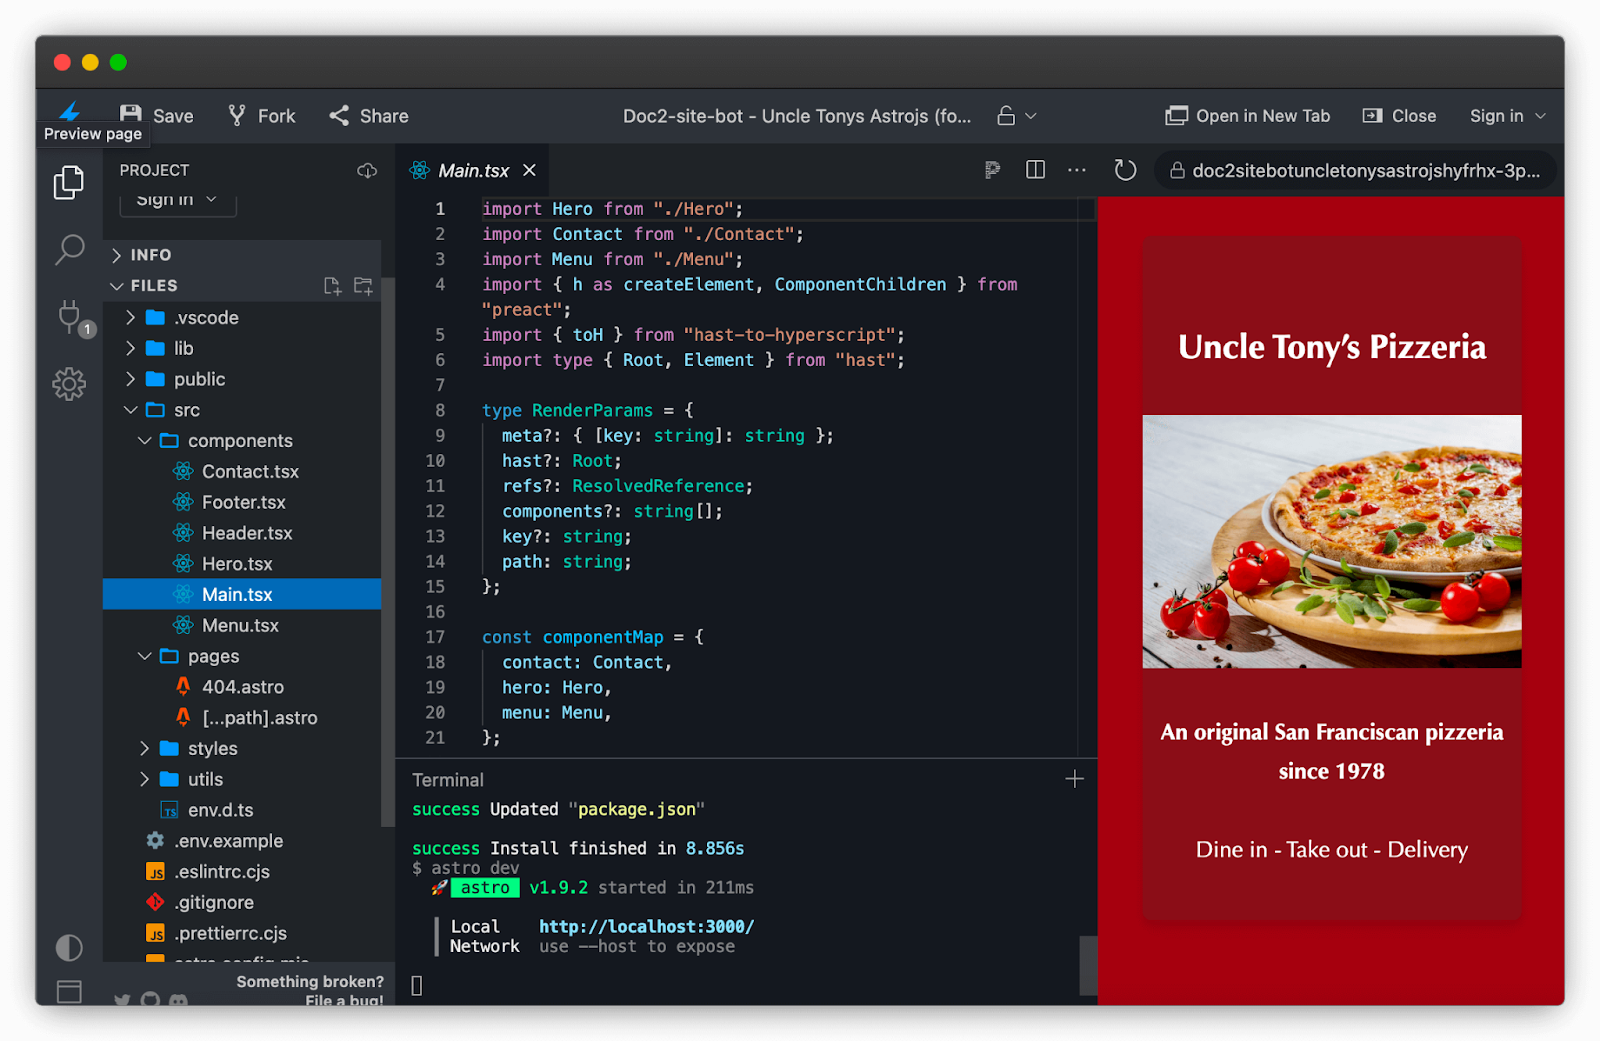
The fastest way to start experimenting is to open Uncle Tony’s project in a developer environment in the browser, for example with Astro: https://stackblitz.com/fork/github/doc2-site-bot/uncle-tonys-astrojs.
You can also checkout the repository locally:
- For Astro: https://github.com/doc2-site-bot/uncle-tonys-astrojs
- For Next.js: https://github.com/doc2-site-bot/uncle-tonys-nextjs
- For Nuxt: https://github.com/doc2-site-bot/uncle-tonys-nuxtjs
For this tutorial, we’ll use Uncle Tony’s Astro project as reference.
Content source#
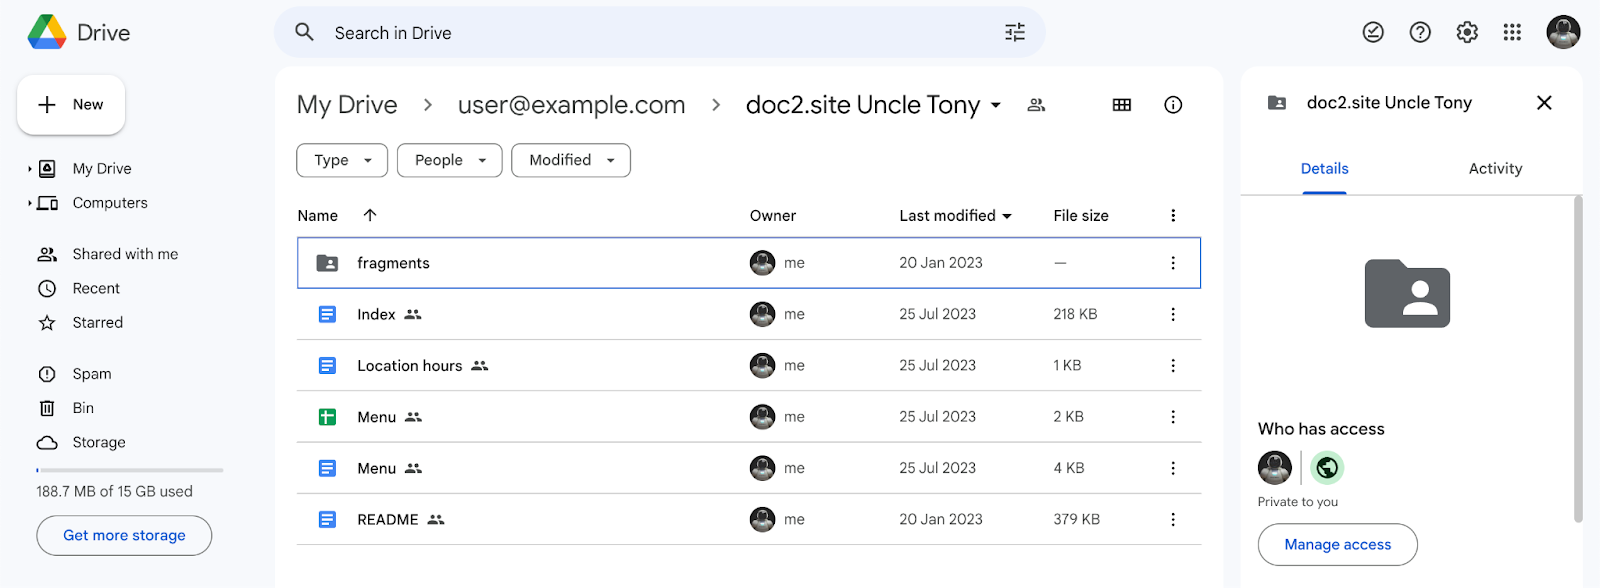
Let’s start by duplicating the Google Drive content into your own doc2.site. Simply copy paste all documents and spreadsheets from Uncle Tony’s folder including the fragments folder and its content. If you’ve configured the Browser Extension to publish content for this project, you can bulk preview all documents from the root and preview the Menu sheets individually.
Development#
The Astro project is configured to fetch content from the Project ID 1yAR0vQ6Di6va7X4Rtd-004iajFdNSH_v. To update the Project ID to your project, locate the file src/pages/[...path].astro and update project.
const project = 'PROJECT_ID';
If you’ve published the content to the Private workspace, you can add your credentials in a .env file at the root with the following variables:
D2S_EMAIL=EMAIL

D2S_SECRET=SECRET
If credentials are found, the Private workspace will be used by default in development and the credentials will be passed via a basic authorization header, else the Preview workspace is used as fallback. This logic can be changed in the src/utils.index.ts file in the getWorkspace() function:
function getWorkspace() {

  if (import.meta.env.D2S_EMAIL && import.meta.env.D2S_SECRET) {

    return "private";

  }

  return process.env.NODE_ENV === "production" ? "live" : "preview";

}
You can then run npm run dev to start the local development environment using your own published content at http://localhost:3000.
Pages#
Routing is based on one of Astro’s core concepts, Dynamic Routes which gives us the flexibility to match REST parameters in the path with [...path].astro. This helps us to catch any path and execute the logic to fetch the published document for the given path and render it.
The fetched document is returned as JSON with the fields:
meta: contains the document metadata like title and description.hast: the content of the document in hast format which is a specification for representing HTML as an abstract syntax tree.components: the list of components to render for the page.references: the list of references to include for the page including images, documents and spreadsheets.
If you’d like to know all fields that are returned, please read the API spec.
Metadata#
The only metadata rendered is the title and the description for each page, directly in the <head> element of the page.
<head>

  <meta charset="UTF-8" />

  <meta name="viewport" content="width=device-width, initial-scale=1.0" />

  <meta name="description" content={meta?.description} />

  <link rel="icon" type="image/png" href="/favicon.svg" />

  <title>{meta?.title}</title>

</head>
Additional metadata can be added into the meta object by using a meta table in the document with extra key-value pairs see Metadata. It is automatically excluded from the hast tree.
Some metadata is inferred based on the content if not explicitly defined:
- Title is inferred from the h1 heading.
- Description is inferred from the first paragraph.
- Image is inferred from the first image.
References#
All document and spreadsheet references are resolved with the function resolveReferences()from the src/utils.index.ts file before rendering, mostly the header and footer for all pages but also the menu sheets for the menu page.
The resolved header and footer document hast are then passed down to be rendered together with the requested document hast.
Components#
All components are written using Preact, a faster 3kB alternative to React and located under src/components. All pages are structured with a <Header>, <Main> and <Footer> component.
The <Header> and <Footer> components take their respective hast as prop to render while the <Main> also takes in addition all resolved references including sheets, the components to render and the current pathname.
The <Main> component holds a mapping of all components to render when encountered in the hast tree including the <Contact>, <Hero> and <Menu> components. Alternatively, the components could be imported lazily or hydrated by Astro on demand powered by Astro’s Island Architecture.
All components are styled with the default Tailwind CSS utility classes without any customization.
Hypertext Abstract Syntax Tree (hast)#
When a document is published, the unstructured content stored in Google Docs is transformed into Structured Content powered by the Unified ecosystem.
First, any representation data in the content is stripped off. The reason is simply because styles don’t translate into semantics and since content can be represented differently on the web based on the device for example, a left aligned text may work fine for desktop but not work for mobile. Then the content is structured into smaller reasonable components to facilitate the identification of certain parts of the content that require special handling for example dynamic client interactions.
Example of a simple hast document with a “Welcome” heading represented in hast format:
{

  "hast": {

    "type": "root",

    "children": [

      {

        "type": "element",

        "tagName": "h1",

        "className": ["fullscreen"],

        "properties": {

          "id": "h.lc3qc7ofl7ta",

        },

        "children": [

          {

            "type": "text",

            "value": "Welcome"

          }

        ]

      }

    ]

  }

}
There are mostly 3 strategies to render hast trees:
- Exclusive content selection: only selected parts of the hast tree get queries and rendered, everything else is ignored. If an author misplaces content, it can be catched upfront and ignored.
- Inclusive content selection: the whole tree gets rendered creating no content boundaries for authors. Every type of content can be rendered properly in any order.
- Mixed exclusive and inclusive content selection: some parts of the tree e.g. a component adopts the exclusive rendering strategy while free form content e.g. paragraphs and headings adopt the inclusive rendering strategy.
Out of the box, Preact provides an h() function which is based on hyperscript that turns your JSX into Virtual DOM elements. Similarly, we turn hast trees into JSX using hast utilities powered by the Unified.js Ecosystem.
import {createElement} from 'preact'

import render from 'preact-render-to-string'

import {toH} from 'hast-to-hyperscript'

console.log(render(toH(createElement, hast)));
Yields the following HTML:
<h1 id="h.lc3qc7ofl7ta" class="fullscreen">Welcome</h1>
Sometimes, it’s not necessary to render the whole hast tree. You can query nodes in the tree using the hast-util-select utility which works similarly to the DOM querySelector, querySelectorAll and matches functions.
To retrieve text content from elements, you can use the hast-util-to-text utility.
import { select } from 'hast-util-select';
import { toText } from 'hast-util-to-text';

const heading1 = select('h1, hast);

console.log(toText(heading1));
The hast utilities are lightweight and enable to write isomorphic code that runs client-side and server-side regardless of the framework or library (Astro, Next.js, Nuxt, React, Preact, Svelte, Solid, Vue etc.)
Media#
Images are represented in the hast tree as img elements and are always wrapped in paragraphs.
Document images are optimized and converted into avif and webp formats out of the box. Image will be resized to be as large as possible within the given width or height while preserving the aspect ratio.
The height and width properties of the img correspond to the image dimensions inlined in the document.
The following image variants are supported:
default: scaled down (not enlarged) to max 1600x1600 pixels300: shrunk or enlarged to 300x300 pixels600: shrunk or enlarged to 600x600 pixels900: shrunk or enlarged to 900x900 pixels1200: shrunk or enlarged to 1200x1200 pixels1600: shrunk or enlarged to 1600x1600 pixels
Example of the pizza image represented as hast element:
{

  "hast": {

    "type": "root",

    "children": [

      {

        "type": "element",

        "tagName": "p",

        "properties": {},

        "children": [

          {

            "type": "element",

            "tagName": "img",

            "properties": {

              "alt": "pizza",

              "height": 1089,

              "width": 727,

              "src": "https://api.doc2.site/v1/images/5c3307d4-6f77-469f-553f-fce0bb96b200.default.webp",

            },

            "title": "delicious pizza",

            "children": []

          }

        ]

      }

    ]

  }

}
To support custom media formats like MP4 which are not natively supported in Google Docs, upload the media, make it public from drive and link it from the document that will be published. The file will be available as reference and can be used as a source of e.g a <video> element.
Sheets#
Spreadsheets can be used to augment documents' capabilities of representing raw data. Sheets can be referenced in document components as properties and vice versa, documents can also be referenced in cell sheets.
Sheet data is represented as an Array of key-value objects. Please note that the keys are normalized e.g. lowercase and spaces are replaced with dashes.
A single spreadsheet can contain multiple sheets. All published sheets have references to their sibling sheets.
For example the beverages sheet data displayed in the <Menu> component is represented as follows:
{

  "sheet": {

    "id": 1592046842,

    "title": "beverages"

  },

  "sheets": [

    {

      "id": 0,

      "title": "pizzas"

    },

    {

      "id": 728803939,

      "title": "custom"

    },

    {

      "id": 741875796,

      "title": "appetizers"

    },

    {

      "id": 1592046842,

      "title": "beverages"

    }

  ],

  "rows": [

    {

      "type": "Fountain Drinks",

      "name": "Coke, Diet Coke, Sprite, Root Beer",

      "price": "2"

    },

      "type": "Lemonade",

      "name": "",

      "price": "3.25"

    },

    {

      "type": "House Wine",

      "name": "Glass",

      "price": "5.75"

    },

    {

      "type": "House Wine",

      "name": "Full Carafe",

      "price": "16.25"

    }

  ]

}
Search#
Published content metadata is indexed for a given project and workspace and the index includes document and sheet metadata. The index can be traversed and filtered with JMESPath.
Here’s an example that shows how to retrieve the whole index for published documents for a given project in the Preview workspace with JavaScript:
const req = await fetch('https://api.doc2.site/v1/docs/search/preview/PROJECT_ID', {

       method: 'POST',

       headers: {

           'content-type': 'application/json'

       },

       body: JSON.stringify({

           query: '[]',

           engine: 'JMESPath'

       })

   });

   if (req.ok) {

       const { data } = await req.json();

      // Display the data array
      console.log(JSON.stringify(data, null, 4));

   }
Deployment#
The project is deployed on Netlify’s Edge Functions to render the content dynamically (SSR).
If you have forked the project in GitHub, GitLab, BitBucket, or Azure DevOps, you can use the Netlify website UI to deploy your Astro site.
- Click “Add a new site” in your Netlify dashboard.
- Choose “Import an existing project”. When you import your Astro repository from your Git provider, Netlify should automatically detect and pre-fill the correct configuration settings for you.
- Make sure that the following settings are entered, then press the “Deploy” button:
- Build Command: astro build or npm run build
- Publish directory: dist
After deploying, you will be redirected to the site overview page. There, you can edit the details of your site.
Any future changes to your source repository will trigger preview and production deployments based on your deployment configuration.
Based on your use cases, you’ll have to find out which rendering strategy works best:
- SSR (Server Side Rendering)
- SSG (Static Site Generation)
- CSR (Client Side Rendering)
When pages are server-side rendered, the requested page will typically query the published document given the requested path and then render the page on the fly. And if the document is not found, return the default 404 page. This use case should be reserved for highly dynamic pages with frequent content updates.
For static use cases, you need to provide all page paths in advance to pre-build the site. This can be accomplished by requesting the /docs or /search endpoint for a given workspace and project folder.
If you decide to leverage the browser to render the tree (client-side rendering), the easiest way is to insert the HTML output into the Document from the resulting DOM tree out of hast-util-to-dom parsing.
Webhooks#
If Static Site Generation is used to build and deploy the website, you probably want to do it every time the content gets updated to always serve fresh content to your visitors. One way to do it could be to configure a cron job to periodically rebuild the whole site and deploy it. A better way to do it is to use the built-in webhooks to message an external web server whenever content is published and unpublished with the doc2.site tooling extension. This way, you only rebuild and deploy the site when content gets updated.
To configure webhooks, go to the Dashboard Configurator and create a project configuration that specifies a webhook URL pointing to your server.
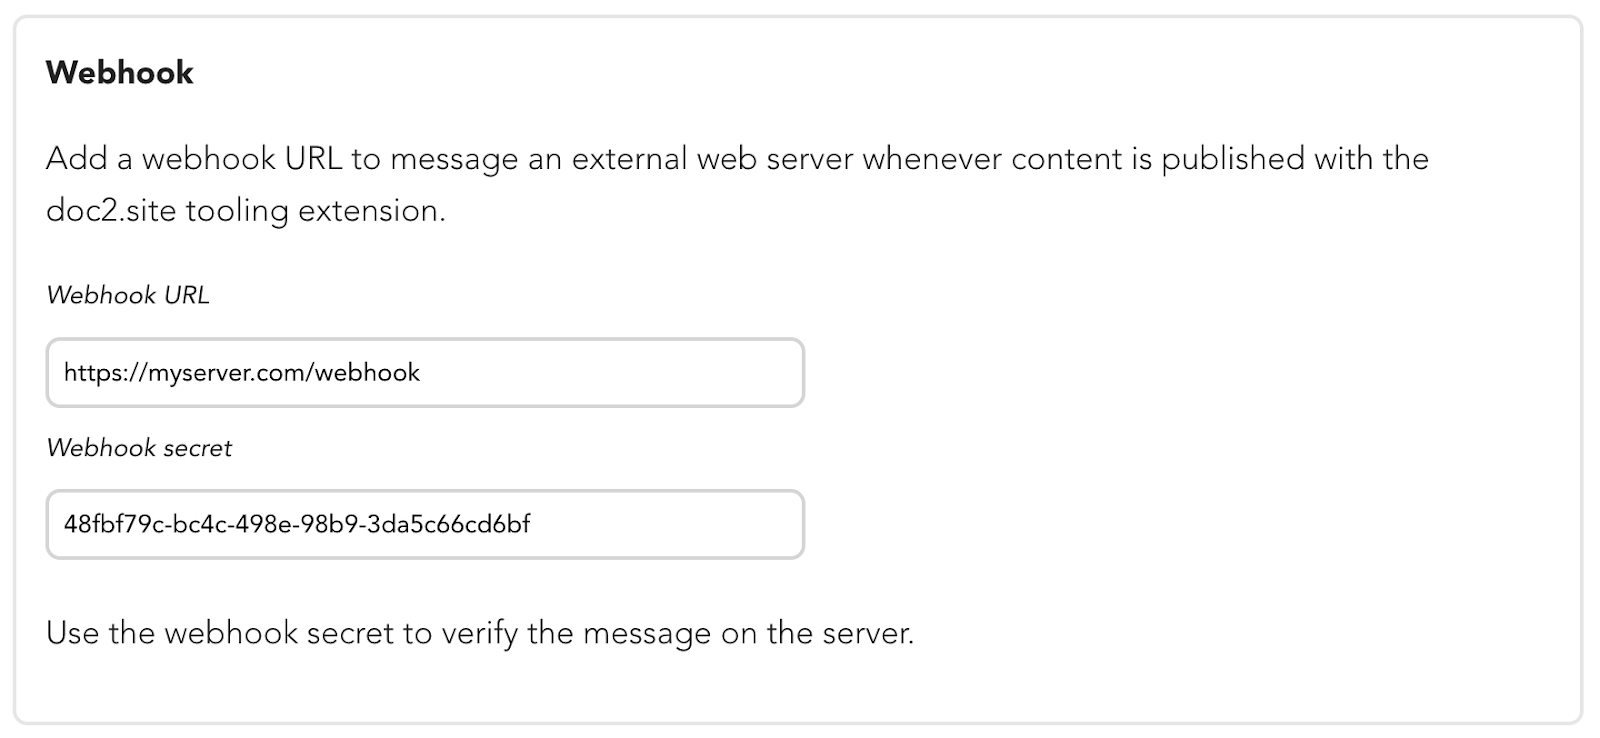
Once your server is configured to receive messages when an event occurs, the server will receive an HTTP GET request with data about the event to the URL that you specified. You should validate the webhook signature before processing the delivery further, this is where the Webhook secret comes into play.
First store the secret securely on your server. The message is delivered with a hash signature computed with the HMAC-SHA512 algorithm based on the webhook's secret and the published url. The following example illustrates how to implement HMAC verification on the server with JavaScript:
if (pathname === '/webhook') {

    const encoder = new TextEncoder();

    const algorithm = {

        name: 'HMAC',

        hash: {name: 'SHA-512'}

    };

    const key = await crypto.subtle.importKey(

        'raw',

        encoder.encode(WEBHOOK_SECRET),

        algorithm,

        false,

        ['sign', 'verify']

    );

    const hexToByte = (hex) => {

        const key = '0123456789abcdef'

        let newBytes = []

        let currentChar = 0

        let currentByte = 0

        for (let i = 0; i < hex.length; i++) {   // Go over two 4-bit hex chars to convert into one 8-bit byte

            currentChar = key.indexOf(hex[i])

            if (i % 2 === 0) { // First hex char

                currentByte = (currentChar << 4) // Get 4-bits from first hex char

            }

            if (i % 2 === 1) { // Second hex char

                currentByte += (currentChar)     // Concat 4-bits from second hex char

                newBytes.push(currentByte)       // Add byte

            }

        }

        return new Uint8Array(newBytes)

    };

    if (await crypto.subtle.verify(

        algorithm.name,

        key,

        hexToByte(searchParams.get('signature')),

        encoder.encode(decodeURIComponent(searchParams.getAll('url')[0])),

    )) {

        // TODO Rebuild website here

        return new Response(JSON.stringify(searchParams.getAll('url')));

    }

    return new Response(`Unauthorized`, {status: 401});

}
The following parameters are sent along to the server:
Parameter | Description |
|---|---|
action | publish | unpublish | bulk-publish | bulk-unpublish |
signature | Hash signature computed with the HMAC-SHA512 algorithm based on the webhook's secret and the published url |
url | Published or unpublished document/sheet URL. In case of bulk-publish, multiple urls can be set as parameters. |
Congrats, you now have a good understanding of how to leverage the API to create a modern Web Experience with Astro. The same principles apply to other web frameworks.
Next, learn more about the API by executing CRUD operations directly from the browser.